How to Add Schema Markup to Webflow Ecommerce
Introduction
Adding schema markup to your Webflow Ecommerce store can increase search visibility. With structured data you can show product information such as price, availability and reviews in search results. This guide will cover how to add schema markup only for Ecommerce pages in Webflow.
Step-by-Step Guide to Adding Schema Markup for Webflow Ecommerce
1. Choose the Relevant Schema Type for Ecommerce For an Ecommerce site you’ll use:
- Product Schema: Shows product name, price, availability and reviews.
- Breadcrumb Schema: Helps search engines understand your site’s structure.
- Offer Schema: Highlights discounts and special offers.
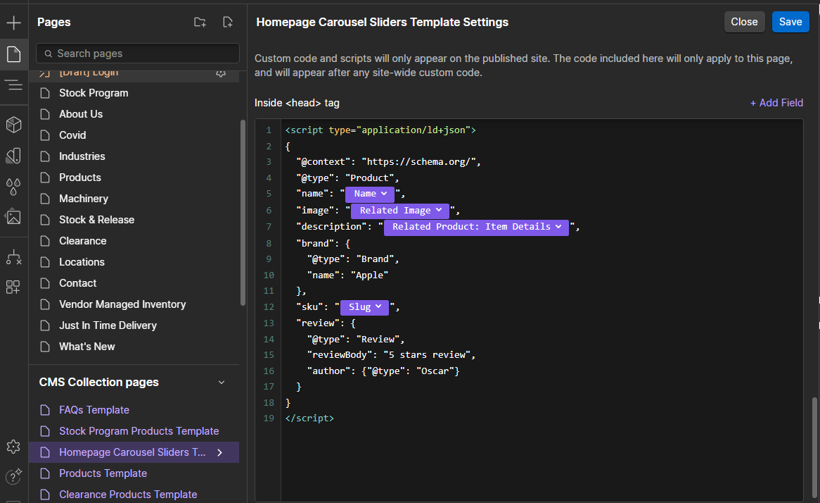
Example Product Schema:
2. Add Schema Markup to Ecommerce Pages
Open the Settings for the relevant Ecommerce page or product template.

- Scroll to the Custom Code section.
- Add the JSON-LD schema markup in the <head> or <footer>.

- Use Webflow CMS fields to populate schema data dynamically. For example:
- Use {{Product Name}} for product name.
- Use {{Price}} for product price.
- Use {{Product Image URL}} for product images.
3. Test Schema
- After adding the schema markup use Google’s Rich Results Test to test your schema.
- https://search.google.com/test/rich-results
- Make sure all data is populated and there are no warnings or errors.
Summary
Adding schema markup to your Webflow Ecommerce site will increase your product pages visibility in search results and drive more clicks and sales. Done right and your site will stay competitive and users will get product information in search results.


