Getting connected to Google Merchant Center can open up big advertising opportunities like Shopping Ads and free product listings. If you manage your product data in Google Sheets you can create a feed directly in Merchant Center without any integrations. This guide will show you how to add an ecommerce feed with Google Sheets to Google Merchant Center.
Why Google Sheets for Merchant Center?
Google Sheets is a simple and flexible tool for managing product data, especially for small to medium sized ecommerce businesses. Benefits include:
- Simple feed creation and updates.
- No API integration required.
- Easy collaboration and data entry.
Step by Step
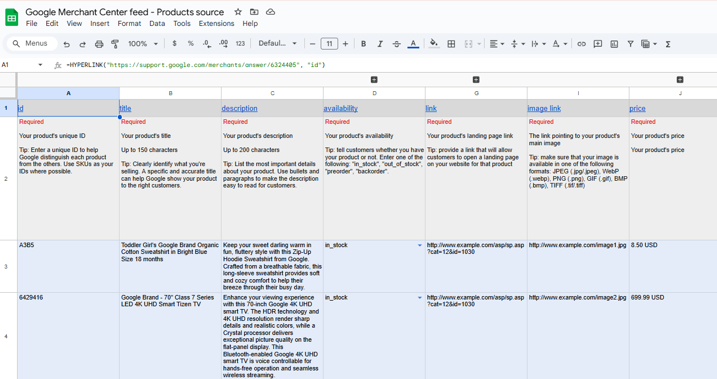
1. Prepare Your Product Data in Google Sheets Start by creating a Google Sheet with your product data. Make sure your columns match the Merchant Center attributes. At a minimum include:
- ID: A unique identifier for each product.
- Title: Product name.
- Description: Product description.
- Link: Product page URL.
- Image Link: Product image URL.
- Price: Product price.
- Availability: Stock status (e.g. in stock, out of stock).
- Brand: Product brand.
For full list of required and optional attributes see Google’s product data specification.
Example Sheet Layout:

2. Google Merchant Center Setup
- Log in to your Google Merchant Center account. If you don’t have one, create a new account.
- https://merchants.google.com/
- https://merchants.google.com/
- Verify your website URL in Business Information.
3. Create a Feed with Google Sheets
- Go to Products > Feeds in the left hand menu.

2. Click the add products or + button to create a new feed.
- Select your target country and language.
- Choose Google Sheets as your input method.
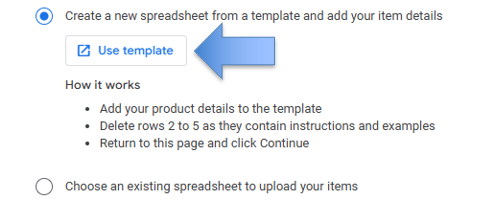
- Create a new sheet or select an existing one. If you create a new sheet Google will provide a template with pre-configured columns.

4. Fill the sheet
- Fill the sheet with your product data, following the format and attributes.
- Avoid errors by using correct data and matching attribute values to Google’s specifications (e.g. correct availability terms like “in stock”).

6. Fix and Optimize After uploading Merchant Center will process the feed. Check for errors or warnings under Diagnostics:
- Fix missing or incorrect attributes in the Google Sheet.
- Optimize titles, descriptions and images to improve product visibility in Shopping Ads.
Tips
- Update the Google Sheet regularly to reflect stock, prices and availability.
- Use high quality product images to get more clicks.
- Include keywords in product titles and descriptions for better search relevance.
Done
Using Google Sheets to add an ecommerce feed to Google Merchant Center makes feed management simple and your products ready for Shopping Ads and free listings. With proper setup and optimization you can get more visibility and more traffic to your store.


